Administrator Guide
The ThreatX™ Managed API and Application Protection platform is a Protection as a Service offering that protects your APIs and applications from the full breadth of Layer 7 security threats, including traditional OWASP attacks, bots, malicious automation, DDoS, and API-specific attacks.
This guide focuses on the administrator tasks.
Administrator overview
The ThreatX platform has configuration, user, firewall, and other settings that can be managed by the ThreatX SOC, your local administrator, or a combination of both. Your ThreatX account must have write access to perform these tasks.
Interfaces
The administrative settings can be accessed from the ThreatX user interface or API command line interface.
The ThreatX user interface presents the data the platform collects into various pages and tables. The ThreatX navigation bar has a Settings menu, under which you can access the pages discussed in this guide. You can log in to the ThreatX user interface at x.threatx.io/.
The ThreatX platform uses a RESTful API and supports a full set of application capabilities that can be used ad-hoc, in scripts, and in automation toolsets. Common uses include creating and managing user accounts, provisioning new sites to be protected, and managing certificates. To access the ThreatX API, you need an API key to help you authenticate and create a session token, as described in Generating and revoking API keys. To use the ThreatX API, you need to know the API token and the tenant name. For details about the API endpoints and commands, see the API Reference Guide (requires a ThreatX account to access).
Firewall settings
When adding sites or testing DNS cutovers, you might need to reference the following ThreatX sensor IP addresses and the CNAME for your tenant. These were set when the sensors were deployed.
- ThreatX Service IPs
-
IP addresses that represent the ThreatX sensors. These IP addresses must be whitelisted in your environment to ensure traffic can reach your application.
- Sensor DNS Targets
-
CNAMEs you can use to ensure HTTP and HTTPS traffic reaches your sensors. The CNAME provided for your tenant is all you need for all your sites. The ThreatX sensor is Server Name Indication (SNI) aware and refers to the hostname provided in each request when visualizing and routing traffic. Request traffic for each of your sites is routed to the backend you defined for that site on the site’s details page.
In the ThreatX user interface, navigate to and select Firewall. If you have access to the ThreatX API, you can use the ThreatX /tx_api/v1/services endpoint, list command.
| The ThreatX /tx_api/v1/services endpoint list command returns the service IP addresses, but not the CNAME records. |
Tenants and channels
Tenants are organizational units. Administrator user accounts are provisioned within these tenants. Once provisioned, users can view protected sites, attack heuristics, real-time data, and other configuration information.
Alternatively, you can have your ThreatX platform organized by channels, where a channel can contain multiple tenants. If you have channels, you can administer all users and sites within the tenants and add tenants as needed.
Optional features
The ThreatX platform has the following optional features that are available depending on your configuration.
-
Risk-based blocking
-
Edge caching
-
Sensitive data
-
Site certificate management
For more information about these features, see the ThreatX Managed API and Application Protection Platform Overview Guide. If you require any feature that is not enabled, contact the ThreatX SOC.
Managing listed IPs
The IP lists are used to block, deny, and allow IP addresses. An IP address in the block list is there temporarily. An IP address in the blacklist or whitelist is there permanently until it is manually removed. As an administrator, you might need to manually add or remove an IP address or CIDR range from the list.
In the ThreatX user interface, navigate to Settings > IWAF. The IWAF Settings page has tabs for Blocked IPs, Blacklisted IPs,and Whitelisted IPs. If you have access to the ThreatX API, you can use the ThreatX /tx_api/v1/lists endpoint to manage the lists.
The lists are often managed by your analysts and, therefore, the procedures to manage the lists are provided in the ThreatX Managed API and Application Protection Platform Analyst Guide. **
Managing Risk-Based Blocking
If the ThreatX Risk-Based Blocking feature is enabled, you can configure the following settings.
In the ThreatX user interface, navigate to and select Firewall. If you have access to the ThreatX API, you can use the ThreatX /tx_api/v1/customers endpoint.
| Setting | Description |
|---|---|
Risk-Based Blocking Timeout |
Length of time a threat is blocked. Applies only to those threats that are blocked automatically. Default is 30 minutes. |
Risk-Based Blocking Threshold |
Risk Level score. Any threat that meets or exceeds the score is blocked automatically. Default is 70. |
Block Embargoed Countries |
When checked, any traffic from a country that is on the USA embargo list is blocked automatically. Countries include Iran, North Korea, Syria, Sudan, Cuba, and Venezuela. Contact ThreatX SOC if you need rules to block countries not on the list. |
Block TOR Exit nodes |
When checked, all incoming traffic from a TOR Exit node is not allowed. Tor Exit Nodes are the gateways where encrypted Tor traffic hits the Internet. |
Managing sites and site groups
A site is a web property serving API responses intended for consumption by an application. Your environment might have many sites, where some sites might not be under ThreatX protection.
You can add, edit, or remove sites with the ThreatX user interface or ThreatX API.
Site settings
The ThreatX sensor operates as a reverse proxy and is designed to monitor and act on incoming HTTP(s) request traffic to prevent attacks and unwanted activity from reaching your web application and API servers. The backend you define for each site can be a single CNAME or a list of IPs – wherever traffic can be properly routed to reach your origin servers.
If using the ThreatX user interface, navigate to . If you have access to the ThreatX API, you can use the ThreatX /tx_api/v1/sites endpoint.
Some of the settings are on the Sites page as column headers.
To add a site, click the Add Site. To edit a site, click Edit Site button for the specific site. In either case, the configuration settings open in the Site Details page.
| Section | Setting | Description |
|---|---|---|
Listener Configuration |
Host Name |
Domain name protected by the sensor (for example, www.example.com). It must be unique across all configured sites and cannot contain uppercase letters. Once created, the configured hostname cannot be changed. |
SSL Enabled |
Allows HTTPS connections to the hostname. Use this setting to provide your own site certificate (in PEM format). The setting does not need to be enabled if using ThreatX managed certificates with Let’s Encrypt. For more information, see the Site certificates section. |
|
SSL Terminate Only |
If set, SSL connection is terminated at the sensor and requests are sent through a proxy to the backend using HTTP. |
|
Redirect HTTP traffic to HTTPS |
If enabled, requests made to the hostname using HTTP receive a 301 response code and are redirected to the same hostname using HTTPS instead. |
|
HTTP2 Enabled |
Allows HTTP Version 2 traffic. |
|
Wildcard Subdomains Enabled |
For example, if enabled for site with “example.com” hostname, site configuration also applies to all requests sent to “subdomain.example.com”. |
|
Backend Configuration |
Origin |
Location where traffic can be properly routed to reach your origin server, also called a backend. You can specify a single hostname or CNAME, or a comma-separated list of IP addresses. |
HTTP Backend Port |
Port number of the origin server or load balancer accepting HTTP traffic. |
|
HTTPS Backend Port |
Port number of the origin server or load balancer accepting HTTPS traffic. |
|
Blocking Modes |
Risk-Based Blocking |
If set, any entity with accumulated risk above the risk-based blocking threshold support.threatx.com/hc/en-us/articles/360047689451-IWAF-Settings-Explainedis blocked. The threshold settings are described in Managing Risk-Based Blocking. |
Request Blocking |
If set, individual requests that are obvious hostile attacks, as determined by the ThreatX rules, are blocked. |
|
Manual Action Blocking |
If set, users can manually add IP addresses to the blocked list and blacklist. |
|
Caching Configuration |
Static Caching Enabled |
Enables static caching. See Managing caching for details. |
Dynamic Caching Enabled |
Enables dynamic caching. See Managing caching for details. |
|
Proxy Configuration |
Maximum Request Body Size |
Maximum client request body in MB as read from Content-Length header. Accepts values from 1 to 1,000,000 (1MB to 1TB). Default is 1MB. |
Proxy Read Timeout |
Timeout in seconds for reading a response from the backend. Accepts values from 1 to 3,600 (1 second to 1 hour). Default is 90 seconds. |
|
Proxy Send Timeout |
Timeout in seconds for sending a request to the backend. Accepts values from 1 to 3,600 (1 second to 1 hour). Default is 30 seconds. |
|
Set Real IP From Enabled |
When checked, client requests override the IP address (as recognized by sensors). |
|
Custom Response Headers Enabled |
Inserts one or more custom headers into responses, including common security headers such as Content-Security-Policy. Each custom header must have a name and value. |
|
Access Configuration |
Site Groups |
You can assign the site to an existing site group, which allows you to limit which users can access the site configuration and its associated data. |
Adding a site
| Adding a site can impact the cost of the ThreatX platform. For information, contact the ThreatX SOC. |
If you are adding a site for protection within the ThreatX platform, perform the following.
Review the following onboarding checklist. If the answer to ANY of the questions is yes, contact ThreatX Support at support@threatx.com with details so we can assist.
| Question | Notes | Yes/No |
|---|---|---|
Does the application process requests with well-formed SQL queries? |
This is common in Help Desk and Bug-Tracking software. |
|
Does the application process requests with well-formed HTML? |
This is common for Content Management Systems. |
|
Does the application require Two-Way SSL for client authentication? |
||
Does the application utilize WebSockets? |
||
Does the application require a specific TLS version or cipher suite restriction? |
Default is TLS 1.2 and 1.3. |
|
Are any custom rules required to enforce a unique security or business requirement? |
For example, block traffic from foreign countries. |
|
Is there ANY additional infrastructure that exists outside of the following flow? Client —–> ThreatX sensor —–> Application |
Examples include a load balancer or proxy in use between the client and ThreatX sensor. |
|
Is there any upstream architecture, such as a firewall or CDN, where you need to whitelist your ThreatX service IPs? |
-
Use the ThreatX user interface or API to add the site and enter the configuration settings, as described in the Site settings section.
-
If you are not using the Let’s Encrypt option for client-facing certificates, provide the SSL Certificate PEM file in the SSL Enabled site setting.
-
Once the site is available in the ThreatX user interface, cutover DNS to direct traffic to the CNAME provided for your tenant through your DNS provider. The CNAMEs are provided in the IWAF settings, as described in the Firewall settings section under Administrator Overview. This can be done at your own pace.
If you are adding multiple sites, you can add the additional sites first then cutover DNS after.
If your DNS provider does not allow you to point to a root domain directly to a CNAME, contact ThreatX SOC to provide the sensor ingress IP addresses to use as A records.
Once your site is configured and traffic is flowing through your sensor, you should see traffic populated in the dashboard. If you do not see any traffic, contact the ThreatX SOC.
Site certificates
You have two options. You can use Let’s Encrypt or upload your own certificate.
The ThreatX platform can manage the SSL/TLS certificates presented to your site’s visitors with Let’s Encrypt. The Let’s Encrypt integration allows you to offload the overhead and management commonly associated with managing SSL/TLS certificates while ensuring that an expired certificate is never presented to your site’s visitors. For more information, contact the ThreatX SOC.
To upload your own certificate using the ThreatX user interface, perform the following:
-
Navigate to .
-
If updating a certificate for an existing site, locate the site. You can use the search icon in the Hostname column to locate a site. Then click Edit Site.
-
In the configuration page, enable SSL Enabled.
-
Click
-
Paste your Site Certificate, Intermediate Certificate, and your Private Key, in PEM format and in that order.
-
Click Save at the bottom of the page.
If adding a site, enter your certificate using steps 3 through 6.
To ensure the correct certificate is being presented, the ThreatX platform validates the following:
-
Correct site or wildcard domain is listed as the Common Name or in the SAN attribute within the certificate.
-
Current date is within the notBefore and notAfter fields.
-
Private key provided is the same key that was used to sign the certificate.
-
Formatting of the uploaded certificate chain is in the proper PEM format, without any headers present or any other characters that should not exist.
If one of these criteria is not successfully validated, you receive an error describing the issue and, where applicable, the old certificate continues to be utilized. If you confirm that you have the correct certificate and keypair for the site and the certificate has not expired but are still receiving an error, contact the ThreatX SOC.
Optionally, you can ask a third-party test group, such as Qualys SSL Lab, to test and validate your certificate.
Site groups
You can create a site group then assign sites to a single group, which allows you to limit which users can access the site configuration and its associated data.
When creating a group, give it a name, list of sites to include in the group, and list of users that can access the sites in the group.
If using the ThreatX user interface, navigate to . If you have access to the ThreatX API, you can use the ThreatX /tx_api/v1/sitegroups endpoint.
Managing sensors
Sensors are managed by your local administrator or the ThreatX SOXC depending on if you self-host or are hosted within the ThreatX cloud, respectively.
You can view the on-premises deployed sensors and their status from the ThreatX user interface, . The Sensor Keys tab lists the keys used with the sensors. You add a key only when deploying a sensor and delete a key when the associated sensor is no longer in use.
If using the ThreatX API, you can access the same information using the /tx_api/v1/sensor endpoint.
The sensor IP addresses are available in the ThreatX user interface, as described in the Firewall settings section under Administrator Overview. These addresses must be added to the whitelist in your environment to ensure traffic can reach your application.
If the ThreatX SOC hosts your sensors, you might notice the number of sensors fluctuate, or that an individual sensor’s uptime has changed. This is because sensors are designed to be added, removed, upgraded, and replaced as needed to ensure optimal site availability and protection. For the latest information, see our release notes.
If you are contemplating deploying new sites, new tech stacks, or new architecture, contact the ThreatX SOC. For more information about deploying sensors, see the ThreatX Sensor Deployment Guides.
Configuring notifications
There are two types of notifications:
-
Analytical events
-
ThreatX platform maintenance and system status For information about receiving logs, see Receiving event logs.
Analytical events
You can configure users to receive notifications on various events relating to threats, rule matches, changes to the IP allow, deny, and block lists. Notifications are typically sent by email, but you can configure a webhook notification to another app, such as Slack.
You create notifications in the ThreatX user interface by navigating to . You can add a notification or edit an existing notification.
If using the ThreatX API, you can use the /tx_api/v1/subscriptions endpoint.
The following table describes the notification settings.
| Setting | Description |
|---|---|
Name |
A unique name to identify this notification. Lowercase letters, hyphens, and numbers only. |
Enabled |
When Enabled, notifications are sent to the specified target as configured. When Disabled, no notifications are sent to the specified targets. |
Event Subject Area |
You can send all events or limit the notification to specific types of events: |
Event Incident |
If you specify a type of event in the Event Subject Area, you can further limit the type of event. There is no selection available if you select All Event Subjects in the Event Subject Area. |
Event Source |
You can limit notifications to alerts from a specific ThreatX system component. |
Limit By Site |
You can limit notifications to alerts for events that affect one of a list of sites. Only available when you select All Event Subjects or Entity-related Events in the Event Subject Area field. |
Limit By WAF List Type |
You can limit notifications to events for one or more IP lists. Only available when you select WAF List (Blacklist, Blocklist, Whitelist) Entry-related Events option in Event Subject Area. |
Notification Targets: Method |
Notifications can be sent to as many email addresses and webhooks as needed. For webhooks, you enter the URL of the app where you want to receive the notifications. However, you need to configure the app to receive the notifications. For example, you can send notifications to Slack as described in their Incoming Webhooks article. |
ThreatX maintenance and system status
You can view and subscribe to notifications for scheduled maintenance windows and any issues that might impact your ThreatX services at ThreatX Status.
Receiving event logs
The ThreatX Log Emitter exports event logs from the ThreatX platform to your log receiver and SIEM. You can use the logs in your investigations and to trigger events in your chosen log management solution.
Features
The Log Emitter forwards full details for all block, match, and audit events.
The logs are pushed are in JSON lines format over a TCP connection that is encrypted, and optionally authenticated, over TLS. If the Log Emitter subscription becomes suspended, the Log Emitter service queues your logs for delivery upon successful re-connection, and periodically attempts to re-establish a connection.
In the event a Log Emitter subscription becomes suspended, the Log Emitter service queues your logs for delivery upon successful re-connection, and periodically (every half hour) attempts to re-establish a connection.
Once the Log Emitter re-establishes a connection for a previously suspended subscription, all queued log events are sent to the configured receiver. If the Log Emitter subscription cannot be resumed after several retries, this might indicate a configuration error or log receiver error.
Configuring a Log Emitter
To receive logs, you create an instance of the Log Emitter and then encrypt the connection between the Log Emitter and your receiver.
| A certificate is needed to encrypt the connection between the ThreatX Log Emitter service and your log receiver. |
You must generate a self-signed or CA signed certificate for the hostname where the log receiver receives logs, as described in the following section.
There are two options:
| Simple |
Sets up an encrypted TCP connection without authentication |
| Advanced |
Adds mutual server and client certificate authentication to your configuration. |
Simple configuration
For simple encryption of the log data, you need only to generate a self-signed certificate. You can generate a certificate with the following command:
$ openssl req -newkey rsa:2048 -nodes -keyout logreceiver.key -x509 -days 365 -out logreceiver.crtUse the logreceiver.key and logreceiver.crt files on your log receiver.
Configure your on-premises log receiver to accept TCP connections with TLS encryption.
Advanced configuration
To further secure the TCP encrypted connection between the ThreatX Log Emitter and your log receiver, add mutual server and client certificate authentication.
The ThreatX Log Emitter authenticates and encrypts the TCP session using TLS. To add mutual certificate authentication, perform the following:
-
Use the Certificate Authority of your choice to create an SSL certificate and private key for the ThreatX Log Emitter.
-
Create a valid server certificate and key in PEM format to install on the on-premises Log Receiver. Ensure the CN of the server certificate matches the public DNS domain name of the Log Receiver.
-
Configure your on-premises log receiver to accept TCP connections with TLS encryption and client certificate authentication.
-
Configure your on-premises log receiver to accept TCP connections with TLS encryption and client certificate authentication.
Adding a Log Emitter
From the user interface, navigate to . If using the ThreatX API, use the /tx_api/v1/subscriptions endpoint.
| Navigation |
then click Add Log Emitter |
| Endpoint |
|
Configure the settings as described in the following table. Click Save when done.
| Setting | Description |
|---|---|
Name |
Unique name to identify the Log Emitter. |
Hostname |
Host name of your log receiver. |
Port |
Port number that your log receiver listens on. |
Send Client SSL Credentials to Log Receiver |
Check to upload your SSL certificate and key. |
Verify Log Receiver SSL Certificate |
When checked, the Log Emitter verifies the SSL certificate provided by the log receiver before sending log data. |
Enabled |
Check to send logs to your log receiver. |
Description of logs
The BlockEvent log type provides full details on requests that were blocked by the ThreatX sensor.
Example Log:
{"message":"www.examplesite.net/example_uri","msg_type":"BlockEvent",
"timestamp":"2020-12-18T14:05:52Z","user_agent":"Mozilla/5.0 (X11; Linux x86_64;
rv:82.0)","dst_host":"www.examplesite.net","uri":"/example_uri","args":
"oneequals1--","request_id":"d3f02fff5db4824d83d145fad1258959","random_id":null,
"tls_fingerprint":null,"cookie":null,"js_fingerprint":null}| Field | Information | Notes |
|---|---|---|
message |
Complete target path of the request, including hostname and URI. |
|
msg_type |
[BlockEvent] |
|
timestamp |
UTC timestamp of the request. |
|
user_agent |
UserAgent presented by the entity making the request. |
|
ip |
IP address presented by the entity making the request. |
|
dst_host |
Target hostname of the request. |
|
uri |
Target path of the request. |
|
args |
Arguments (if any) provided in the request in www-url-encoded form. |
|
request_id |
Unique identifier assigned to each request by the ThreatX platform. |
|
random_id |
Additional unique identifier assigned to an entity by the ThreatX platform. |
Field returns a null value except when logging an interrogation event. For information on interrogation, contact the ThreatX SOC. |
tls_fingerprint |
TLS fingerprint (if any) associated with the entity making the request. |
|
js_fingerprint |
Additional Unique identifier assigned to an entity by the ThreatX platform. |
Field returns a null value except when logging an interrogation event. For information on interrogation, contact the ThreatX SOC. |
The MatchEvent log type provides full details on requests that matched custom or common rule definitions when examined by the sensor.
Example Log:
{"message":"www.examplesite.net/example_uri","msg_type":"MatchEvent","
timestamp":"2020-12-18T14:05:52Z","request_id":"d3f02fff5db4824d83d145fad1258959",
"user_agent":"Mozilla/5.0 (X11; Linux x86_64; rv:82.0)","matches":[{"id":202202,
"description":"SqlAnalyzer: SQLi detected in form/args, sql_ids: 1","classification"
:"SqlInjection","state":"Exploitation","contrib_score":100,"risk":70,"blocking":true,
"beta":false}],"ip":222.222.222.222","dst_host":"www.examplesite.net","uri":"/","args"
:"oneequals1--,"status_code":0,"ssl":false,"risk":70,"request_method":"GET",
"content_type":null,"content_length":0,"response_length":null,"upstream_response_time"
:null,"postblock_event":false,"random_id":0,"tls_fingerprint":null,"cookie":null,"
js_fingerprint":0,"created":"2020-12-18T14:05:52.174+00:00"}| Field | Information | Notes |
|---|---|---|
message |
Complete target path of the request, including hostname and URI. |
|
msg_type |
[MatchEvent] |
|
timestamp |
UTC timestamp of the request. |
|
request_id |
Unique identifier assigned to each request by the ThreatX platform. |
|
user_agent |
UserAgent header value presented by the Entity making the request. |
|
matches : [ |
Values following this field provide specific information about why the rule that the request’s behavior matched. |
|
ip |
IP address presented by the entity making the request. |
|
dst_host |
Target hostname of the request. |
|
uri |
Target path of the request. |
|
args |
Arguments (if any) provided in the request in www-url-encoded form. |
|
status_code |
Status code that the request received from the upstream server. |
|
ssl |
Request was transmitted over an HTTPS connection [True] or an HTTP connection [False]. |
|
request_method |
Request type [GET] [POST]. |
|
content_type |
MIME content type/subtype (if any) presented in the request. |
|
response_length |
Length in bytes (if any) that the request received from the upstream server. |
|
upstream_response_time |
Length of time in milliseconds (if any) that it took the upstream server to respond to the request. |
|
postblock_event |
Request was submitted after a risk-based block was applied to the entity [True]. |
|
random_id |
Additional Unique identifier assigned to an entity by the ThreatX platform. |
Field returns a null value except when logging an interrogation event. For information on interrogation, contact the ThreatX SOC. |
tls_fingerprint |
TLS fingerprint (if any) associated with the entity making the request. |
|
cookie |
Additional Unique identifier assigned to an entity by the ThreatX platform. |
Field returns a null value except when logging an interrogation event. For information on interrogation, contact the ThreatX SOC. |
js_fingerprint |
Additional Unique identifier assigned to an entity by the ThreatX platform. |
Field returns a null value except when logging an interrogation event. For information on interrogation, contact the ThreatX SOC. |
created |
Timestamp of the request. |
Troubleshooting the Log Emitter
The following procedures describe basic checks that you can perform while troubleshooting your Log Emitter configuration.
Send test logs
Verify that the server and client certificates are correctly generated and installed by running the following openssl command. The Log Emitter sends a single test log to your log receiver. If you do not see DONE at the end, there is an issue with network connectivity or with the server or client certificates.
If using a using self-signed certificate:
$ echo '{"message":"test1"}' | openssl s_client
    -servername logreceiver.yourdomain.com
    -connect logreceiver.yourdomain.com:12345
If using a using mutual certificate authentication:
$ echo '{"message":"test1"}' | openssl s_client
    -servername logreceiver.yourdomain.com
    -connect logreceiver.yourdomain.com:12345
    -cert logemitterclient.crt
    -key logemitterclient.key
Verify your log receiver’s hostname resolves to a publicly accessible IP address
Your log receiver must be able to receive TCP data at the hostname provided to the Log Emitter. If your log receiver’s hostname does not resolve to a publicly accessible IP address, the Log Emitter cannot establish a connection with it or send logs to it.
Verify incoming TCP data
Use tcpdump to verify that the log receiver is receiving TCP traffic on the correct port.
$ `tcpdump` port 12345
Even if you see traffic via tcpdump, you still need to ensure that any host-based firewall, such as iptables, is configured to allow the incoming traffic.
Dump incoming logs to a file (Logstash)**
In logstash, you can create a file output so you can quickly see if it is receiving the logs from the Log Emitter. Add the following to your logstash configuration file and restart logstash:
output {
    file {
        path => "/tmp/threatx-raw.log"
    }
}
Handshake failed error
If you use a self-signed certificate and you receive this error message:
the handshake failed: error 1416F086: SSL Routines:
tls_process_server_certificate:certificate verify
failed:../ssl/statem/statem...cint.c:1915:: self signed certificate
The Log Emitter Send Client SSL Credentials to Log Receiver option might be enabled. When this option is selected, the Log Emitter uses the provided SSL credentials to authenticate itself to the log receiver; however, this authentication fails when using a self-signed certificate. Uncheck the Send Client SSL Credentials to Log Receiver box then click Restart Log Emitter.
Accessing the audit log
The ThreatX audit feature logs events, such as updating users, updating sites, and adding IP addresses to whitelists and blocked lists. The audit log lists all events by category and actions. As opposed to the Log Emitter, the audit log focuses mostly on user actions.
| Endpoint |
|
| Command |
|
| The Log Emitter also exports the audit logs. |
Managing user accounts
- Delete User
-
Click Edit User followed by Delete.
| Endpoint |
|
The following table describes the settings you use to manage user accounts.
| Field | Description |
|---|---|
User’s email address, which is also the username used to log in. Once assigned, the email address cannot be changed. |
|
Password Reset |
Available only when editing a user account. Click Send to send an email to the user with a link to reset the password. |
First Name |
User’s first name. |
Last Name |
User’s last name. |
Active |
When selected, the user is active and can log in. When not selected, the account remains valid, but the user cannot log in. |
Read-Only |
When selected, the user cannot change data. When not selected, the user has full write access. |
Tenant Admin |
When selected, the user has administration permission to manage users and sites. |
Channel Admin |
Available only to with the Channel environment architecture. When selected, the user has administrator access to the main channel and all tenants within it. |
Site Groups |
Assigns the user to one or more user groups, where the user can access those sites only. If none are selected, the user can access all sites. |
Generating and revoking API keys
If using the ThreatX API to access the ThreatX platform, you need an API key to help you authenticate and create a session token. You can then use your Session Token to execute commands.
To generate an API key:
-
Navigate to * and click Add API Key in the top right corner.
-
Fill in the necessary fields.
-
Click Save. You are presented with your new API Key.
To revoke an API key:
-
Navigate to
-
Click Edit API Key next to the API key to revoke.
-
Click Revoke
-
Click Revoke again in the confirmation popup.
Generating and revoking sensor API keys
If you deploy sensors in your environment, you are asked to provide a Sensor API key. The sensor uses the key to authenticate to the ThreatX platform.
To generate a sensor API key:
-
Navigate to
-
Click Add Sensor Key. You are presented with a new Sensor API Key.
-
Save it to a secure location then use it when deploying a sensor.
If you no longer require a key, you can delete the key.
Managing caching
Edge Caching is available if you want to take advantage of the performance and speed improvements commonly associated with caching, but do not have a caching solution in place.
The benefits of Edge Caching include:
-
Faster page load times for end-users.
-
Lower latency.
-
Increased load capacity and reduced application server load.
-
Better ratings from search engines such as Google.
By default, ThreatX Edge Caching follows Cache-Control headers defined by the origin servers. The ThreatX platform does not cache for the following response scenarios:
-
Where Cache-Control is set to Private, No-Cache, or No-Store.
-
Responses that include Set-Cookie in the response header.
-
Responses to POST requests.
The ThreatX platform offers two types of Edge Caching, static and dynamic.
Caching can be enabled for a configured site as described in the Site settings section under Managing sites and site groups.
Static caching
Static caching is configured to cache static elements such as images, CSS & JavaScript. Static caching does not store HTML pages and as a result does not enhance performance if the origin server becomes unresponsive.
The following lists the static caching settings:
-
Default cache expiration: 30 minutes.
-
Supported static file extensions: jpg, jpeg, gif, png, ico, bmp, tif, tiff, svg, svgz, swf, pict, cur, doc, docx, xlsx, ppt, pptx, pdf, woff, woff2, eot, otf, js, ejs, css
-
Support for non-responsive origin servers: No.
-
URI Specific Caching: Per-URI features can be enabled, overriding the origin server values.
-
Manual Cache Purging: Can be purged by ThreatX SOC upon request. Purging can be limited to a specific URI.
Dynamic caching
Dynamic caching offers a higher level of performance, allowing caching and optimization of dynamic content. In some cases, cached content can be delivered even if the origin servers are unresponsive. The ThreatX platform caches all responses to requests made with HTTP GET, and HEAD methods. To avoid caching dynamic pages that are rarely accessed, ThreatX sensors cache dynamic pages only after they are requested at least 3 times. Subsequent requests are served from the cache until the cache expiration defined in the Cache-Control occurs, or for 30 minutes for responses where the expiration is not defined. The following lists the dynamic caching settings:
- Default cache time
-
30 minutes
- Time-to-cache
-
Can be configured by ThreatX SOC upon request.
- URL based caching
-
Can be configured by ThreatX SOC upon request
- Supported file types
-
Any dynamic resources
- Support for non-responsive origin servers
-
500, 502, 503, and 504 response codes. Can be configured by ThreatX SOC upon request.
- Supported request methods
-
GET, HEAD
- URI Caching
-
Per-URI features can be enabled, overriding the origin server values.
- Manual Cache Purging
-
Can be purged by ThreatX SOC upon request. Purging can be limited to a specific URI.
| Dynamic caching is a billable feature and requires an add-on license. |
Managing rate limiting
The ThreatX platform rate limiting is in the form of rules in the common rule set. Rate limiting is primarily focused on count and timeframe. What causes a rule to trigger when based off count and timeframe is limited only by what the rules can match within the requests. For example, one rule is “10 404s in 10s,” where the rule assigns risk to an entity that receives more than 10 404 responses within 10 seconds.
As needed, the ThreatX SOC team can make custom rate limiting rules tailored for your environment. A typical use of this would be to assign risk to entities that fail logins at a login endpoint. These rate limiting rules are very customizable, including the timings (number of requests over time). These rules can be applied across the entire tenant, down to a site or group of sites, or to a single endpoint. The match criteria also have a very wide range of options such as Response Code, Request Method, Source Country/ASN, and Args.
Managing rules
ThreatX rules can specify firewall behavior required for your business’s individual needs, such as restricting certain resources to company IP addresses or limiting the number of failed login attempts to an application developed in-house.
A ThreatX rule is a set of Boolean conditions that, when true, implement the rule’s defined action and risk level. ThreatX rules can watch, temporarily block, permanently block, interrogate, or tarpit suspicious traffic. The action is implemented by the sensor.
You can add, modify, and delete rules, and view’s rule’s activity to determine its effectiveness.
To access rules in the ThreatX user interface, navigate to menu:Settings[Rules*. You can also manage custom rules using the ThreatX API /tx_api/v1/rules endpoint.
| Rules can be complex. Creating or modifying a rule could have unintended consequences. You can request the ThreatX SOC group to create rules or modify any rule in the ThreatX platform to meet the specific needs and behavior of your environment. |
Rule details
To view a rule’s details, navigate to then click Edit Rule Details for a specific rule.
The details are the properties of the rule as follows:
- Description
-
Text that describes the intended behavior or logic a rule match is intended to indicate. This information is displayed in the ThreatX user interface when your custom rule is matched.
- Tag Name
-
Text that identifies a rule when a description is long.
- Classification
-
Describes the kind of attack or behavior the rule is meant to detect.
| Classification | Description |
|---|---|
Undefined |
Unknown attack type. |
SqlInjection |
SQL injection attack. Attempt to exploit input form or unsanitized input vector to the SQL backend. |
XSS |
Cross Site Scripting. Attempt to execute unauthorized code in the user’s context. |
RFI |
Remote File Inclusion. Attempt to have the application server evaluate or include unauthorized 3rd party content or code. |
SessionHijacking |
Attempted unauthorized takeover or co-opting an existing authenticated session. |
DirTraversal |
Directory traversal. Attempt to have the application server evaluate or include unexpected and potentially sensitive content. |
Evasion |
Attempt to evade detection of malicious commands or code with various encoding tricks. |
TrojanActivity |
Indications of known malicious software. |
InfoDisclosure |
Information disclosure. Attempt to inappropriately disclose sensitive information about a server, application, or other. |
ExecutableCode |
Indications of an attempt to upload or execute executable code in a malicious context. |
PasswordGuessing |
Attempted wordlist or online brute-force to gain access to known application accounts. |
PasswordSpraying |
Attempted use of known default, weak, or compromised passwords to gain unauthorized access. |
CredentialStuffing |
Attempted discovery or unauthorized use of compromised user credentials username and password. |
FormSpam |
Abuse user-generated content such as response forms, comments, and reviews for unauthorized promotional purposes. |
OSDetection |
Operating System detection. Attempt to fingerprint server operating system for use in targeting future attacks. |
ContentEnumeration |
Enumerate site pages or content for abusive or malicious purposes. |
PluginEnumeration |
Enumerate content-management-system plugins, software components, and more for use in targeting future attacks. |
UsernameEnumeration |
Attempt to collect authorized users for future malicious purposes. |
ResourceExhaustion |
Attempt to exhaust server CPU and memory resources to negatively impact legitimate services. |
TrafficFlood |
Attempt to exhaust server bandwidth resources to negatively impact legitimate services. |
HighVolume |
High request volume. Suspicious or maliciously high volume of requests, bandwidth used, or other volume with the intent to negatively impact legitimate service. |
ErrorRate |
Elevated error rate. Indication that an offending entity might be performing malicious actions as evidenced by an increase in HTTP errors returned by the server. |
KnownVulnerability |
Attempt to exploit a known vulnerability in the application. |
CSRF |
Cross Site Request Forgery. Attempt to abuse a user or user-agent context to perform unauthorized actions on behalf of logged-in user. |
EscalationOfPrivilege |
Attempt to gain unauthorized access or gain permissions otherwise not expected or permitted for a given user. |
WebShell |
Indicators of malicious code intended to aid in unauthorized access to a web application or server. |
BadBot |
Known malicious or undesirable web bots, spiders, scrapers, or other entities. |
CommandInjection |
Attempt to trigger server-side execution of unauthorized commands through a web form or application. |
CryptoMining |
Cryptocurrency mining. Attempt to use server resources for unauthorized cryptocurrency related activities. |
Toolkit |
Hacker toolkit. Indicators of known security or hacker toolkit attempting access to the web application. |
BotnetActivity |
Indicators of known botnet or infected hosts attempting access to the web application. |
BusinessLogicAbuse |
Abuse of custom business logic or application workflow to commit various fraudulent or unauthorized activity. |
LFI |
Local File Inclusion. Attempt to have the application server evaluate or include local, potentially sensitive, content. |
MaliciousInclude |
Attempt to introduce known malicious code for execution in user or user-agent context. |
SoftwareDetection |
Attempt to fingerprint application technology and frameworks for future malicious use. |
ProgrammaticAccess |
Indicators of programmatic or automated access attempts for the web application. |
CustomerRule |
Custom rules to enforce business logic which might not fit in another rule category. |
-
*State*. Assumed objective. The state maps the intent to a stage on ThreatX Web Application Kill Chain. __
State |
Description |
Reconnaissance |
Basic data collection. |
Scanning |
Scanning for content and known vulnerabilities. |
Web Application Mapping |
Find possible weak points. |
Brute Force Attack |
Gain unauthorized access. |
Denial of Service |
Disrupt application availability. |
Exploitation |
Exploit application weaknesses. |
Malware Communication |
Consolidate position on a compromised server.__ |
-
Risk. Assigned risk level (0 to 100) at which the entity triggers a rule. The higher the rule’s risk, the fewer hits it takes to block a given entity. The biggest factor in determining entity risk is the total risk assigned by rules they trigger. The following are the ranges.
Range |
Description |
[0-10] (Low) |
Best used to track interesting, but not notably suspicious requests. Rules with this risk level never result in a block unless combined with a higher risk rule. |
[11-90] (Medium) |
Should be used for most rules. Multiple matches are required before blocking an entity. This reduces the likelihood of blocking a benign entity (which sent a few odd-looking requests). |
[91-100] (High) |
Indicates a known vulnerability or high likelihood the corresponding request is malicious. A request triggering a risk 91+ rule quickly increases the entity’s risk score and results in a block. |
-
Action. Action for the sensor to perform.
Action |
Description |
Track |
Begin or continue tracking a risk score for the offending entity, based on the risk assigned to this rule and other factors. This is the default and recommended action for most custom rules. |
Block |
Immediately block the request and track a risk score for the offending entity. Blocking rules are best used to stop known malicious behavior, “virtually patch” known vulnerabilities, etc. |
Tarpit |
Limit the speed at which the offending entity receives responses and tracks a risk score for the entity. Tarpit actions are best used to discourage scanning or scraping behavior without immediately blocking the traffic. |
Interrogate |
Challenge an offending entity with a cookie and attempt to fingerprint the user-agent. Interrogation allows a custom rule to explicitly invoke anti-bot mitigations for an entity.** |
-
Visual / JSON. Displays the rule itself. The Visual tab displays the rule in a graphical format. The JSON tab displays the rule in a JSON format.
-
Beta. If checked, the platform does not process matches to this rule.
Rule format
A rule must define at least one criterion to evaluate. Criteria are Boolean expressions that consist of an attribute and a supplied value. Some criteria have an operator to determine how the value is compared. If an operator is not available, the criteria is matched if the attribute value equals the checked value.
Criteria are contained within a group. The group is also a Boolean expression that compares the results of each criterion within the group.
The group uses one of the following operators to evaluate the criteria and determine if the rule is true. A true state is also known as a match.
-
or. Rule is matched if any of the criteria are true.
-
and. Rule is matched if all the criteria are true.
-
not. Rule is matched if none of the criteria are true.
When a rule is matched, it assigns the classification, state, and risk level to the threat. It also performs the configured action.
To evaluate complex conditions, the group can have nested groups. Each nested group can have nested groups.
The following figure shows the Visual tab with the Group Type operator set to and, and one criteria entry with Header as the attribute. The Header attribute has two required variables, direction and field. The direction determines that headers in requests only are checked, and that the header name is User-Agent. For this entry to be true, the header name must contain Bad-Guy.
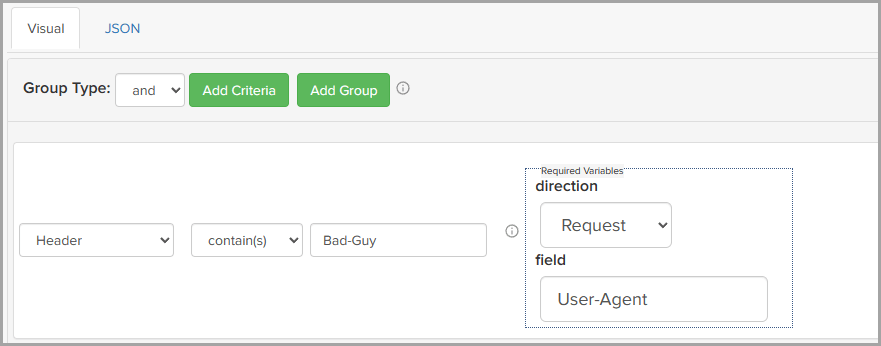
image:rule-group-type.pngrule-group-type,width=881,height=346]
Some attributes within criteria have the following operators available:
-
contain(s). Expression is true if the value includes the provided value.
-
equal(s). Expression is true if the value is equal to the provided value.
-
Starts with. Expression is true if the value begins with the provided value.
-
Regex. Expression is true if the value equals the provided regular expression.
-
Group. Allows you to add a group within the criteria.
There are three types of criteria: entity, request, and response.
Entity
The following criteria evaluate the attributes of a threat or entity.
Attributes |
Description |
Example |
Source IP |
Checks if the entity’s IP address matches at least one of the provided list of IPv4 addresses or CIDR networks. |
127.0.0.1/24,127.0.1.1,127.54.3.64/26 |
Countries |
Uses Internet geolocation to check if the entity’s IP address resolves to at least one of the provided countries. The criteria take a comma-separated list of two-letter country codes (ISO alpha2). |
PR,RU,UA |
Request
The following criteria evaluate the attributes of an incoming request.
| Attributes | Description | Example |
|---|---|---|
Hostname |
Checks if the Host header sent in a HTTP request matches the provided name. |
example.com |
URI |
Checks if the “path” portion of URI sent in HTTP request matches the provided path. |
/wp-login.php |
Arguments |
Checks if the “URL query” or form-encoded postdata sent in HTTP request matches the provided argument. |
wp-submit=Log+In |
Named Argument |
Checks if a specific “URL query” or form-encoded postdata key + value pair sent in HTTP request matches the provided argument. Requires an argument name. |
Log+In, name:wp-submit |
Method |
Checks if the HTTP method used in the request matches the selected method. |
POST |
Header |
Checks if a specific HTTP header value matches the provided header. The direction must be Request. The field must contain the header name. |
Mozilla/5.0 (Chrome) direction:Request header-name:User-Agent |
Response
The following criteria evaluate the attributes of a response.
Attributes |
Description |
Example |
Response Code |
Check the HTTP response code/status code returned by the application. |
401 |
Header |
Check if a specific HTTP header value matches. The direction must be Response. The field must contain the header name. |
JSESSIONID= direction:Response header-name:Set-Cookie |
Rule matching
For a rule to be matched, the condition set by the operator of the group must be true. For example, some of the criteria are matched while others are not. If the group operator is set to or, the rule is matched since at least one criterion is matched. If the operator is and, the rule would not be matched.
Rule activity
The ThreatX user interface displays how often a rule is matched and its action implemented. To view a rule’s activity, navigate to menu:Settings[Rules* then click View Activity for a specific rule. This page is also accessible from other pages by clicking a rule name in the Rules column.
Depending on your configuration, you might need the ThreatX SOC to enable the permission for you to access the rule activity.
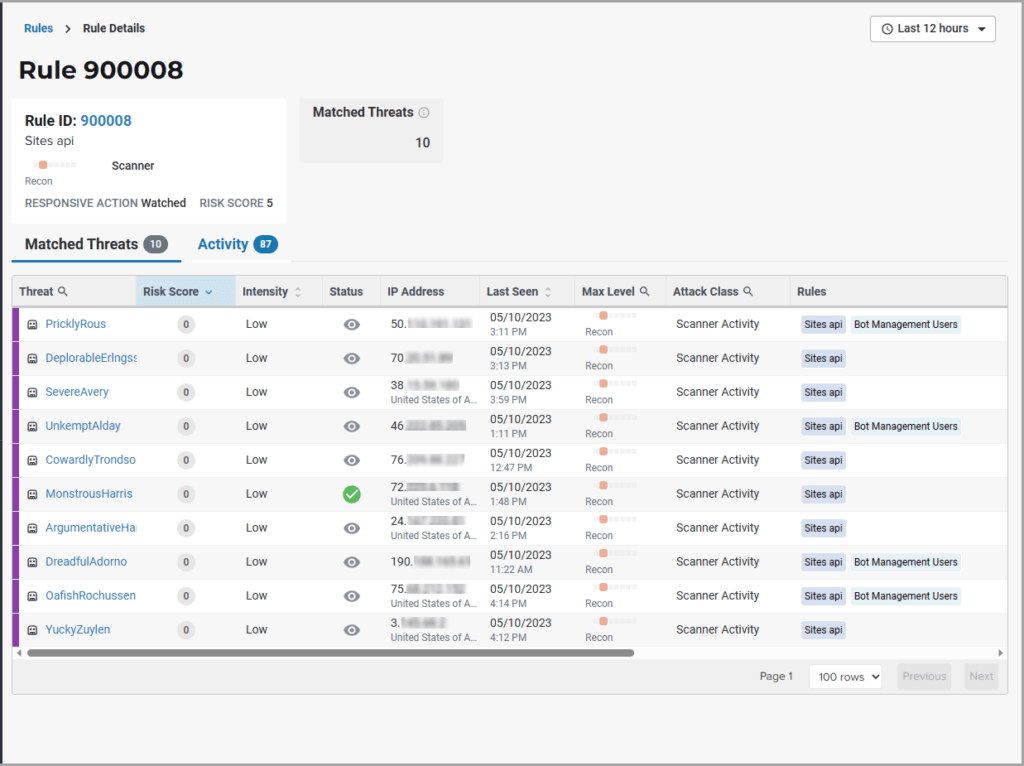
image:Rule-Activity-no-nav-1024x766.pngRule-Activity-no-nav-1024x766,width=1024,height=766]
You can use the data to determine the effectiveness of the rule and if a change is needed. For example:
-
Does a threat match too many rules?
-
Does the rule catch the expected threats?
The Rule ID tile provides some of the details of the rule, which is also provided in the Rule Details page.
The Matched Threats tile shows the total number of threats that matched the rule in the selected time frame.
The Matched Threats table provides data for each threat that matched the rule. The table lists the other rules that were matched by the threat. Clicking a rule name in the Rules column displays that rule’s activity page. Hovering over a rule in the Rules column also highlights all instances of the same rule in the other rows. The Match Events column shows the number of times traffic matched a rule within the selected time range and its change over time. A significant value could indicate a security problem.
You can click Activity to view the Activity table, which lists each attack and the time it occurred.
For detailed information about the other data in the table, see the ThreatX Managed API and Application Protection Platform Analyst Guide.
Configuring Single Sign On (SSO)
You can manage SSO configuration directly using the ThreatX API. Once SSO has been configured for a ThreatX tenant or channel, your users can sign in using your SSO identity provider, such as Okta or Azure Active Directory B2C, rather than logging in to the ThreatX web application with a username and password.
Prerequisites
To configure SSO access to the ThreatX user interface for your users, you need the following:
-
SAML2 IDP metadata reference URL from your SSO provider where the most up-to-date metadata file can be found. Most SAML2 implementations provide a quick and easy way to access these files. Consult your IDP documentation. Examples of an IDP metadata reference URL:
-
Okta URL: threat-x.oktapreview.com/app/exk8lh09bhSIfhupl0h7/sso/saml/metadata
-
Azure AD B2C: login.microsoftonline.com/daad3805-fde6-4334-817f-82c723533123/federationmetadata/2007-06/federationmetadata.xml
NOTE: If you do not have access to your IDP metadata URL, you can alternatively provide a complete IDP metadata file. Contact ThreatX support if you wish to provide an IDP metadata file instead of an IDP metadata URL.
-
-
Users must have accounts in both the IDP and ThreatX platform.
-
User’s email address in the IDP must match the email address used for the ThreatX username.
-
API key with tenant or channel administrator permissions. See Generating and revoking API keys for details about generating a key.
-
Name and UUID of your tenant or channel.
-
Use the Customers:list command to retrieve the name and UUID of the tenant.
-
Use the Channels:list command to retrieve the name and UUID of the channel.
-
Additional prerequisites for Channel SSO
If you are configuring your SP Metadata URL:
-
Audience restriction setting (also called “Entity ID”) in the IDP must be set to the https://x.threatx.io/sign-in path.
-
IDP metadata must provide the NameID in the format: urn:oasis:names:tc:SAML:1.1:nameid-format:emailAddress
-
We use the email address of the user to locate users within our database.
-
When configuring the IDP, the Assertion Consumer Service URL (ACS) of our Service Provider (SP) is x.threatx.io/auth/v2/customers/{your_threatx_tenant_uuid}/acs
-
For IDPs that support Service Provider metadata, the metadata URL of our SP is x.threatx.io/auth/v2/customers/{your_threatx_tenant_uuid}/metadata
If you are configuring your ACS URL:
-
When configuring the IDP, the Assertion Consumer Service URL (ACS) of our Service Provider (SP) is x.threatx.io/auth/v2/channels/\{your_threatx_channel_uuid/acs
-
For IDPs that support Service Provider metadata, the metadata URL of our SP is x.threatx.io/auth/v2/channels/\{your_threatx_channel_uuid/metadata
Configuring SSO access
Use the following steps to configure SSO access for your ThreatX tenant and channel partners:
-
Log into the API. Authenticate to the API using the Login command.
-
Gather the tenant or channel data you need.
Use the Customers:list or Channels:list command to find your Customer or Channel Representation information. You need to copy the Customer or Channel Representation information response exactly and paste it into the body of the Customers:update or Channels:update command with the UUID field omitted. -
Assemble your tenant update API request.
-
Supply your Customer or Channel Representation information to the Customers:update or Channels:update command described in step 2. An example of this Customer Representation information can be found below. An example of this Channel Representation information can also be found below.
-
Set the value of “sso” to an object, and within it, set the values for the “enabled” (true), “required” (false), and “saml_metadata_url” parameters.
-
Submit the tenant or channel update API request. If it is successful, you should see Customer Update Response or Channel Update Response.
-
Test the new configuration. Navigate to x.threatx.io/auth/v2/customers/<name>/saml or x.threatx.io/auth/v2/channels/<name>/saml from a web browser.
You should be redirected to your SSO Identity Provider to confirm you wish to authorize ThreatX Dashboard to act on your behalf. Follow the prompts in your SSO Identity Provider. You should be then redirected to the ThreatX Dashboard and authorized to access the system on behalf of your configured user account.
Single-Sign On access is now configured for your tenant.
Optional: You can now update your tenant configuration again using “required: true” to force all your users to use SSO to access the ThreatX Dashboard. This option prevents users from accessing the ThreatX Dashboard directly using the username/password authentication.
API commands and responses
Login: login
The login command uses an API key to return an API access token to be used for further endpoint commands.
The api_key, created within the ThreatX user interface (menu:Settings[API Keys*), is used within the request for the api_token parameter. The response then provides a unique and temporary access_token string to be used in further endpoint commands.
Parameters |
Type |
“command”: “login” |
String |
“api_token”:”<api_key>” |
String |
Example Request
curl https://provision.threatx.io/tx_api/v1/login -H 'Content-Type:
application/json' -d '{ "command":"login", "api_token":"<api_key>" }'
Example Response
{
"Ok": {
    "status": true,
    "token": "<access_token>"
}
}
Customers: list
The list command returns the details of all tenants authorized for the current API access token.
Parameters |
Type |
“command”: “list” |
String |
“token”: “<access_token>” |
String |
Example Request
curl https://provision.threatx.io/tx_api/v1/customers -H 'Content-Type:
application/json' -d '{ "command": "list", "token":"<access_token>" }'
Example Response
{
  "Ok": [
    ...
    {
      "name": "testco",
      "contact_email": "alice@testco.com",
      "description": "Tesco tenant",
      "active": true,
      "autoblock_threshold": 70,
      "autoblock_timeout": 3600,
      "block_embargo": true,
      "ssl_ciphers": null,
      "notify_threshold": 100,
"sso": null,
      "allow_super_admin_users": true,
      "allow_channel_admin_users": true,
"tenant_admin_default": null,
"uuid": <tenant_uuid>
    },
    ...
  ]
}
Customers: update
The update command updates a specified tenant. The SSO object is used to configure the SSO parameters. All other parameters to the customer object should not be modified when configuring SSO.
Parameters |
Type |
“command”: “update” |
String |
“token”: “<access_token>” |
String |
“name”: “<tenant_name>” |
String |
“customer”: \{ } |
CustomerObject |
 +
*CustomerObject*
Parameters |
Type |
“name”: “<tenant_name>” |
String |
“contact_email”: “<email_address>” |
String |
“description”: “<key_description>” |
String |
“active”: true / false |
Boolean |
“autoblock_threshold”: <entity_risk> |
Integer |
“autoblock_timeout”: <timeout_seconds> |
Integer |
“sso”: \{} |
SSO Object |
SSO Object
Parameters |
Type |
Description |
“enabled”: true / false |
Boolean |
When true, users belonging to the tenant are allowed to sign in to the ThreatX user interface using SSO. |
“required”: true / false |
Boolean |
When true, users are required to use SSO to sign in to the ThreatX user interface. |
“saml_metadata_url”: “<saml_url>” |
String |
IDP metadata URL or file. See the Prerequisites. |
Example Request
curl https://provision.threatx.io/tx_api/v1/customers -H 'Content-Type:
application/json' -d '{
  "command": "update",
  "token": "<login_token>",
  "name": "testco",
  "customer": {
    "name": "testco",
    "contact_email": "alice@testco.com",
    "description": "Testco tenant",
"active": true,
"autoblock_threshold": 70,
"autoblock_timeout": 3600,
"block_embargo": true,
"ssl_ciphers": null,
"notify_threshold": 100,
"allow_super_admin_users": true,
"allow_channel_admin_users": true,
"tenant_admin_default": null,
"sso": {
      "enabled": true,
      "required": false,
"saml_metadata_url": "https://login.microsoftonline.com/daad3805-fde6-4334-817f-82c723533123/federationmetadata/2007-06/federationmetadata.xml"
    }
}
}'
Example Response
{"Ok": ": testco updated."}Channels: list
The list command returns the details of all channels authorized for the current API access token.
Parameters |
Type |
“command”: “list” |
String |
“token”: “<access_token>” |
String |
Example Request
curl https://provision.threatx.io/tx_api/v1/channels-H 'Content-Type:
application/json' -d '{ "command": "list", "token":"<access_token>" }'
Example Response
{
  "Ok": [
    ...
    {
      "name": "test_channel",
"require_totp_setup": null,
      "uuid": "81815E73-ABB9-4533-977B-93964B8AAB73",
"sso": null

},
    ...
  ]
}
Channels: update
The update command updates a specified channel. The SSO object is used to configure the SSO parameters. All other parameters to the channel object should not be modified when configuring SSO.
Parameters |
Type |
“command”: “update” |
String |
“token”: “<access_token>” |
String |
“channel”: \{} |
Channel Object |
 +
*Channel Object*
Parameters |
Type |
“name”: “<channel_name>” |
String |
“sso”: \{} |
SSO Object |
SSO Object
Parameters |
Type |
Description |
“enabled”: true / false |
Boolean |
When true, users belonging to the channel are allowed to sign in to the ThreatX user interface using SSO. |
“required”: true / false |
Boolean |
When true, users in the channel are required to use SSO to sign in to the ThreatX user interface. |
“saml_metadata_url”: “<saml_url>” |
String |
IDP metadata URL or file. See the Prerequisites. |
Example Request
curl https://provision.threatx.io/tx_api/v1/channels-H 'Content-Type:
application/json' -d '{
  "command": "update",
  "token": "<login_token>",
  "channel": {
    "name": "test_channel",
"sso": {
      "enabled": true,
      "required": false,
      "saml_metadata_url": "https://login.microsoftonline.com/daad3805-fde6-4334-817f-82c723533123/federationmetadata/2007-06/federationmetadata.xml"
    }
  }
}'
Example Response
{"Ok": "Channel: test_channel updated."}Configuring Mutual TLS (mTLS) configuration
This section details the configuration and setup of Mutual TLS (mTLS) for secure communication between various components within our system. mTLS establishes a mutual authentication process between clients and servers, ensuring a robust and authenticated connection. You can enable mTLS in both downstream and upstream configurations.
In Transport Layer Security (TLS), the traditional setup involves the server authenticating itself to the client. However, mTLS enhances security by enabling both the client and server to authenticate each other during the communication process.
Configuring downstream mTLS
Downstream mTLS involves the WAF sensor serving as the server, authenticating incoming client connections. This setup is crucial for securing communication between end-user applications (clients) and the WAF.
Make sure your environment meets the following requirements for downstream mTLS:
-
Site must be configured for TLS (HTTPS) via the SSL Enabled option on the Site Details page.
-
Availability of the CA certificate used to sign client certificates, which utilizes as Downstream mTLS Credentials in the site configuration. This certificate must be in PEM format.
-
Clients must be configured to send their certificates during the TLS handshake.
Configuration steps:
-
Access the Site Details page through Settings → Sites, selecting Edit Site for the relevant site.
-
In the SSL Configuration section, enable Downstream mTLS by checking the designated checkbox.
-
Populate the Downstream mTLS Credentials field with the CA certificates used for validating client certificates.
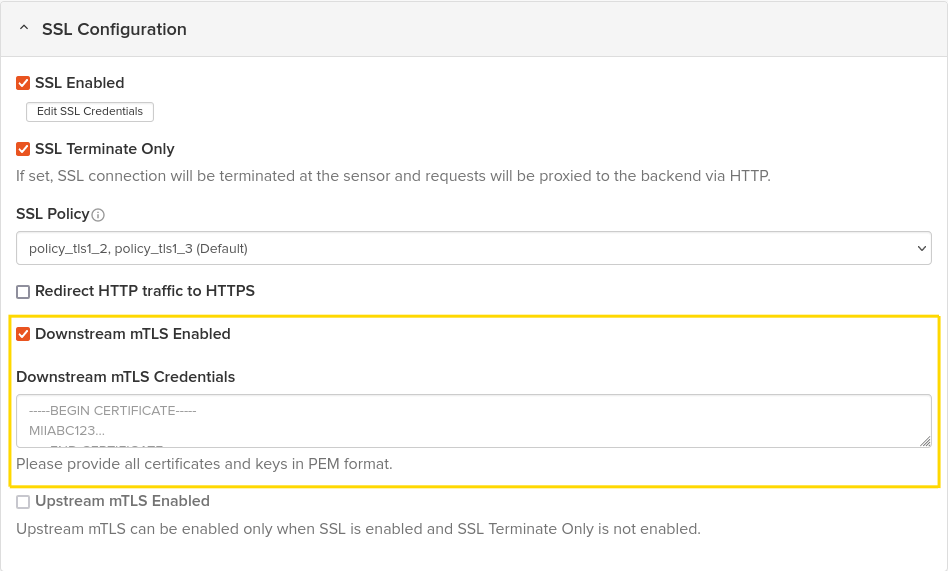
image:mTLS1.pngmTLS1,width=948,height=571]
Configuring Upstream mTLS
Upstream mTLS involves the WAF sensor acting as the client, authenticating itself to the origin server. This setup ensures secure communication from the WAF to the origin server.
Make sure your environment meets the following requirements for upstream mTLS:
-
Site must be TLS-enabled via the SSL Enabled option in the Site Details page.
-
Ensure that the TLS connection termination does not occur at the WAF sensor; the SSL Terminate Only checkbox should remain unchecked. The origin server should be configured for HTTPS.
-
Availability of both the client certificate and private key in PEM format, used as the Upstream mTLS Credentials in the site configuration.
-
The origin server should be configured to request client certificates during the TLS handshake.
Configuration Steps:
-
Access the Site Details page through Settings → Sites, selecting Edit Site for the relevant site.
-
Within the SSL Configuration section, enable Upstream mTLS by checking the designated checkbox.
-
Populate the Upstream mTLS Credentials field with both the client certificate and private key.
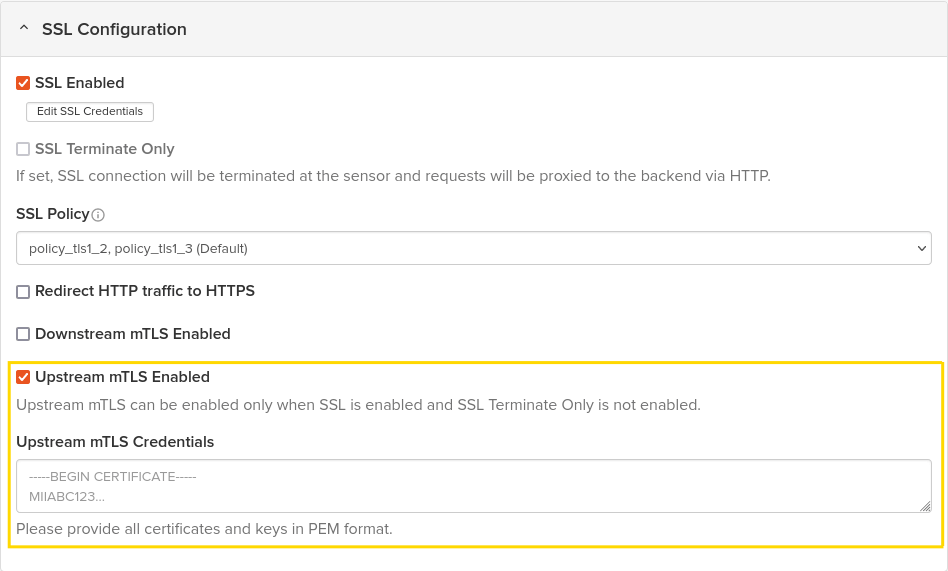
image:mTLS2.pngmTLS2,width=948,height=571]
Notes
-
The simultaneous configuration of both Downstream and Upstream mTLS is possible and can be individually managed within the Site Details page.
-
To expose the mTLS settings within the Site Details page, a tenant needs to enable the feature flag site-config-mtls.
Conclusion
By configuring Mutual TLS in both downstream and upstream modes, you establish a secure and authenticated communication channel between clients, the WAF, and the origin server, ensuring robust protection and trust across the implementation.
Testing for Vulnerabilities
The ThreatX four-stage blocking strategy is designed to reduce false positives while preventing malicious behavior from reaching your sites. When Request-Based blocking is enabled, the sensor blocks any standalone malicious request. When Risk-Based blocking is enabled, the sensor issues a series of timed block periods to any entity that exhibits persistent suspicious or malicious behavior, leading to a permanent blacklisting if the behavior continues. During a 30-minute Block period or while an entity is blacklisted, all requests from that entity are blocked from reaching the site.
When testing for vulnerabilities against your internal applications, the IP addresses of your penetration testers should be added to the whitelist prior to testing, and removed after testing is complete.
When testing for vulnerabilities in the sensor, the IP addresses of your penetration testers should not be added to the whitelist.
To add an IP address to the whitelist:
-
Click Settings in the navigation bar then select IWAF.
-
In the IWAF Settings page, click the Whitelisted IPs tab.
-
Click the Add Entry button.
-
In the Add Whitelist Entry screen, enter the IP address.
-
Enter the reason for adding the IP address.
-
Set the Expiration. Typically, you choose Never but you do need to remove the address from the list when done testing.
-
Click Submit.
When done testing, remove the address by opening the Whitelisted IPs tab and click the Remove button in the entity’s row.
Recommended Tools and Methodologies
-
Scanners
Scanners, such as ZAP and https://portswigger.net/burp/[Burp], can be a useful tool for testing the ThreatX Request and Risk-based blocking capabilities. However, they are likely to be blocked quickly and sent to the blacklist. -
Leverage multiple IP addresses
When attacking the ThreatX sensor with a single IP address, that IP address accumulates risk and is delivered a series of Risk and Request-Based blocks before being placed on the blacklist. The entity associated with that IP address can be removed from the blacklist, but the associated Risk Level from that entity does not reset to “0” upon removal. An entity’s Risk Level can be reduced over time by demonstrating a reduction in suspicious behavior or malicious attack attempts. Try leveraging several IP addresses or ranges when pen testing the ThreatX sensor.
You can see when the IP address is blocked from the ThreatX user interface. In the following screenshot, the Gray requests were blocked from reaching the application. The White request was allowed through as it did not contain a standalone, viable attack or high-risk behavior.
Troubleshooting sensor issues
When you have an issue with sensors, contact the ThreatX SOC at support@threatx.com with a description of your issue.
Depending on the nature of the issue, the ThreatX SOC might request one of the following files.
-
HTTP Archive format (HAR) file. HAR files contain sensitive data, including content of the pages you downloaded while recording as including your cookies. The ThreatX SOC can use it to troubleshoot connectivity or other issues with the sensor.
-
PCAP (Pocket CAPture) file. The file contains captured network packets. The SOC requests a PCAP file only if you host your own sensors.
How to generate a HAR file
How you generate a HAR file depends on the web browser you use.
Generating a HAR file in Chrome:
-
Open Google Chrome and navigate to the page where the issue is occurring.
-
Look for the Vertical ellipsis button and select More Tools > Developer Tools.
-
From the panel, select the Network tab.
-
Look for a Record button in the upper left corner of the tab and make sure it is red. If it is grey, click it once to start recording.
-
Check the Preserve log box.
-
Click the Clear button to clear out any existing logs from the Network tab.
-
Reproduce the issue you are experiencing.
-
Once you have reproduced the issue, right-click anywhere on the grid of network requests and select Save as HAR with Content.
-
Upload the HAR file as an attachment to your ThreatX support ticket for further.
Generating a HAR file in Mozilla Firefox:
-
Open Mozilla Firefox and navigate to the page where the issue is occurring.
-
Select the Mozilla Firefox menu (three horizontal parallel lines) at the top-right of your browser window, then select Web Developer > Network.
-
From the panel, click the Network tab.
-
The recording automatically starts when you begin performing actions in the browser.
-
Once you have reproduced the issue and you see that all the actions have been generated in the Developer Network Panel (should just take a few seconds), right-click anywhere under the File column, and click on Save all as Har.
-
Upload the HAR file as an attachment to your ThreatX support ticket for further analysis.
Generating a HAR file in Internet Explorer:
-
Open Internet Explorer and go to the page where the issue is occurring.
-
Press F12 on your keyboard (or click the gear icon > F12 Developer Tools).
-
Click the Network tab.
-
Reproduce the issue that you were experiencing while the network requests are being recorded.
-
Once done, click Save and save it as a .har file.
-
Upload the HAR file as an attachment to your ThreatX support ticket for further analysis.
Generating a HAR file in Safari:
-
Before generating the HAR file, make sure you can see the Develop menu in Safari. If it is not there, follow the instructions in https://support.apple.com/en-ie/guide/safari/use-the-developer-tools-in-the-develop-menu-sfri20948/mac[Use the developer tools in the Develop menu in Safari on Mac].
-
Open the Develop menu and select Show Web Inspector.
-
Click the Network tab and complete the activity that is causing issues.
-
Click the Export icon on the far right of the network tab and save the HAR file.
-
Upload the HAR file as an attachment to your ThreatX support ticket for further analysis.
Edge natively produces HAR files. For more instructions, see the instructions from the https://docs.microsoft.com/en-us/microsoft-edge/devtools-guide/network[Microsoft website]. To generate a HAR file in Edge:
-
Open the Network tool in F12 developer tools.
-
Reproduce the issue.
-
Export captured traffic as a HAR (CTRL + S).
-
Upload the HAR file as an attachment to your ThreatX support ticket for further analysis.
How to generate a PCAP file
The PCAP file is relevant only if you host your own sensors.
To generate a PCAP file that the ThreatX SOC can analyze for troubleshooting connectivity or other issues with the WAF sensor, follow these instructions:
-
Use ssh to connect into the docker host system.
-
Use the following command to display the name of the desired container:
docker ps -
Use the following command to obtain a shell within the WAF container, with the newly obtained container name:
docker exec -it <container ID> /bin/bash -
Run the following commands to update the repository package lists as well as install
tcpdumpwithin the container:
apt-get update
apt-get installtcpdump -
With
tcpdumpinstalled within the container, capture the network traffic with the following command:
tcpdump-i eth0 -s 0 port not 22 -w /tmp/upload_to_threatx.pcap -
Exit the Docker container and use the following command to copy the PCAP to the host system:
docker cp <container ID>:/tmp/upload_to_threatx.pcap upload_to_threatx.pcap -
Upload the PCAP file to a ThreatX support ticket for further analysis.